The MemoryC Guide to Memory Page 2
Setting Up Your Memory
On installing new memory in your machine, proceed immediately to the BIOS. The memory settings are usually either in the global tweaking/overclocking menu of enthusiast boards, or in the advanced chipset features in mainstream variants. In nearly all cases you will only get the best out of your RAM by setting it up manually, as the automatic setting is deliberately set to very conservative settings to maximise compatibility and ensure you can get into the BIOS without any issues. One of the main reasons for this is that a lot of the better memory around requires a higher voltage than the original specifications state. It is not uncommon to see CAS 4 kits of PC2-6400 that require a voltage of 2.1V of more, so before setting the memory to the tighter settings, this will need to be set.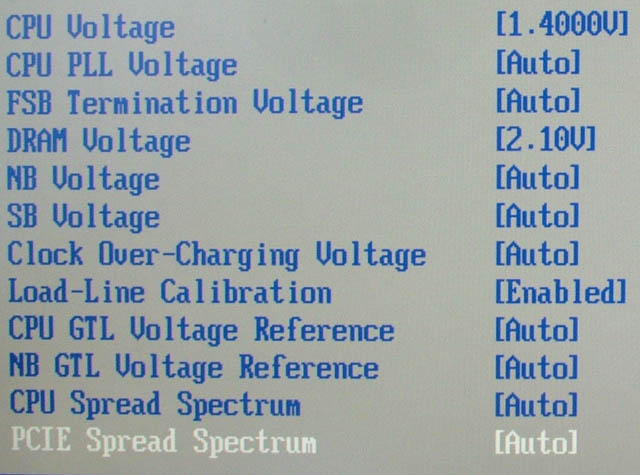
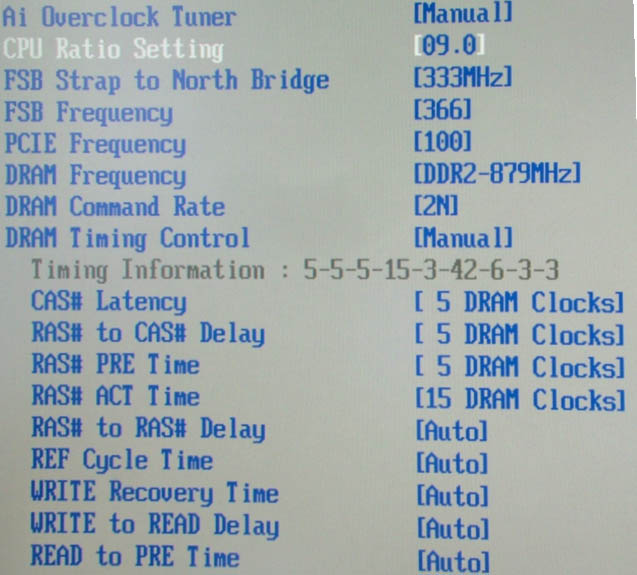
The above screen shot shows a typical DRAM sub menu within the BIOS. As you can see, you have option to set different memory speeds as well as manually define the latency timings. Before gaining access to the memory timings menu we had to set the BIOS to manual mode. Whilst many premium motherboards claim to have automatic tweaking options built in, these are almost invariably useless and you will only get the best out of your system by learning its intricacies. You will notice that in addition to the CAS, tRCD, tRP and tRAS, there are also changeable settings for various other timings. Most of these have only minor effects on performance and should be left at auto, but if you have a few hours (or more likely days) to kill, you can play with them manually to see how they effect the stability and performance of your PC. Our example modules consist of a 2GB kit of GeIL Ultra PC2-6400 CAS4 memory, so we have set the timings to 4-4-4-12 and the memory speed to 800MHz. If using a kit of PC2-5400 we would have set the speed to 667MHz, or if using premium PC2-8500, it would be set to 1066MHz.
The above screen shot shows the voltage sub-menu of our example BIOS. The one we are interested in for memory tweaking is vDIMM, which alters the voltages being supplied to the memory modules. By default, DDR2 memory is set to 1.8V, though many kits require more than this to correctly operate. Our example kit requires 2.1V so we have set this value. It is very important that the voltage be set to the correct setting, otherwise it will probably not be stable and you could experience crashes and other anomalies. Never set the memory voltage too high or you will damage the modules. Running the voltage of your memory significantly higher than the settings recommended by the manufacturer could cause long-term damage to the modules and will void your warranty.
More Memory = More complications
The rated speed and timings of a dual channel kit of RAM only apply when that is the only memory installed in the PC. When you add more memory to a system, more strain is placed on the motherboard’s chipset meaning you will often have to reduce the memory speed or slacken off the timings to attain stability. If we go back to our example kit of GeIL PC2-6400 CAS 4, it is very possible to have two identical kits that work perfectly by themselves at their rated timings, but won’t be stable when the four sticks are installed together. This problem is exacerbated if you install non-matching kits of memory, as the non-user controllable settings their SPD chips demand may be in conflict with each other. For this reason, it is best to purchase a memory kit with your ideal density to begin with, rather than sticking in half this amount with a view to doubling it when prices come down or you have saved up more money. It is now possible to buy very dense memory modules, where 4GB of RAM is provided on just two sticks. Where as these super-dense modules used to attract a hefty price premium and had slack memory timings, you can now get 4GB kits that run at CAS 4, or PC2-8500 speeds quite happily. Just make sure you have a premium grade motherboard to back these kinds of kits up, as entry level models will probably struggle to keep so much memory stable.Overclocking
Whilst 667MHz, 800MHz and now 1066MHz are standard options in high end motherboards, many kits can be purchased that are rated considerably beyond these speeds. Naturally these kits are designed for overclockers, and in order to unlock the full performance potential of these modules you will need to be running an overclocked machine. In Intel-based systems, the memory clock speed is directly linked to the motherboard’s Front Side Bus or FSB. When overclocking CPUs, overclockers increase the FSB to increase the clock speed. Take a Core 2 Duo E8400 as an example. Its default front side bus is 333MHz (1333MHz quad pumped) and its multiplier 9.CPU Frequency = Front Side Bus x Multiplier
So:
333MHz FSB x 9 = 3000MHz
If we increase the FSB to 400MHz, the CPU will be overclocked substantially;
400 MHz FSB x 9 = 3600MHz
These are the fundamentals of overclocking modern PCs. However, because the memory bus is linked to the FSB frequency, as you overclock, the memory speed also increases. Motherboard’s offer various memory speeds by utilising different divider settings. For example with a 333MHz FSB processor, the following divider options are available. Remember the speed we use with all kinds of DDR memory is its effective frequency so the speed the module physically runs at is half the quoted speed (just to make things more confusing!).
So with a 333MHz FSB processor, the following dividers are available (FSB/DRAM);
PC2-5400 memory (667 MHz effective, 333 MHz actual) = a 1:1 ratio
PC2-6400 memory (800 MHz effective, 400MHz actual) = a 5:6 ratio
PC2-8500 memory (1066 MHz effective, 533 MHz actual) = a 5:8 ratio
PC2-8500 memory (1066 MHz effective, 533 MHz actual) = a 5:8 ratio